- Joined
- Jul 18, 2020
- Points
- 128
- Location
- Portchester, Fareham
- Model of Z
- 1998 BMW Z3 Individual 1.9 M44 B19
Ok so it's the weekend again !....... ok top domestic news.... I fixed the washing machine !!..  .. ended up being a new sump pipe and new pump. (total cost about 50 quid and lots of swearing) Now purrs like a kitten and pumps water out stronger than Linda Blair in the Exorcist.....
right.. so with a happy wife...let's get back to the Z3 !!
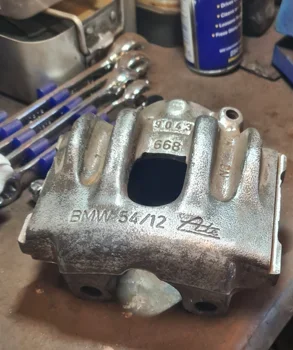
Focus today was on front Calipers.... so it was lots... and lots.... and lots... of grinding rust and other detritus off the surfaces.
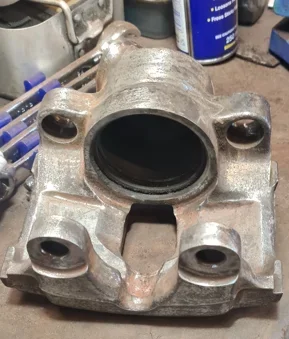
used a wire pipe brush for the piston bore and the slider and bolt holes...


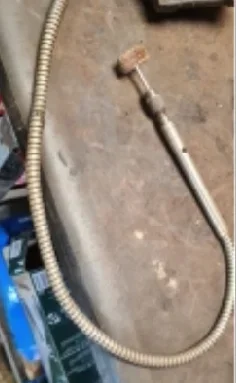
although it worked well, it was a little too rigid, so I then dug out my drill flexi attachment.. but, screwed it into the pillar drill instead of a hand drill, this enabled me to have both hands free..


If you use barrel sanders on a Dremel, one little tip I can offer is, don't push the sanding tube all the way down on the rubber barrel. Leave it slightly overlapping and that way, the top of the sander is more flexible and can get into more nooks and crannies..

Then it's into the paint booth !)")


that'll do for now, and tomorrow I'll do the other one
.. ended up being a new sump pipe and new pump. (total cost about 50 quid and lots of swearing) Now purrs like a kitten and pumps water out stronger than Linda Blair in the Exorcist..... right.. so with a happy wife...let's get back to the Z3 !!
Focus today was on front Calipers.... so it was lots... and lots.... and lots... of grinding rust and other detritus off the surfaces.
used a wire pipe brush for the piston bore and the slider and bolt holes...
although it worked well, it was a little too rigid, so I then dug out my drill flexi attachment.. but, screwed it into the pillar drill instead of a hand drill, this enabled me to have both hands free..
If you use barrel sanders on a Dremel, one little tip I can offer is, don't push the sanding tube all the way down on the rubber barrel. Leave it slightly overlapping and that way, the top of the sander is more flexible and can get into more nooks and crannies..
Then it's into the paint booth !
that'll do for now, and tomorrow I'll do the other one

")